This app helps merchants export orders from Shopify, sync them with an external fulfillment platform, receive tracking updates, and keep both systems fully in sync.
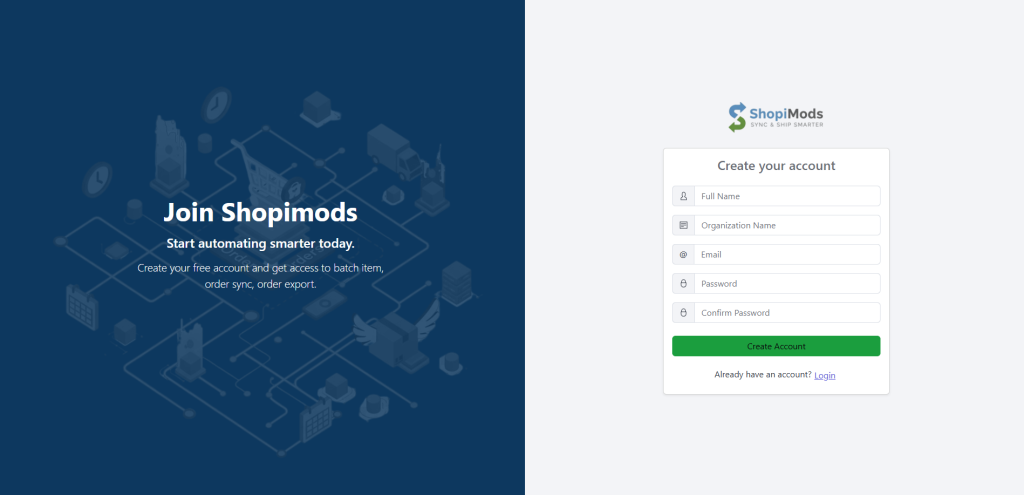
Enter your email address, name, organisation name and password.
Submit the registration form. Once you submit it, we will send an email with the link to activate your account.
Step 2: Verify Email
A verification email is sent immediately after signup
Click the verification link to activate your account
Unverified accounts cannot access the dashboard
Step 3: Access the App Dashboard
Once verified:
Log in to the app
You’ll be redirected to the main dashboard
A subscription is required to continue
The app uses Stripe Subscriptions.
Available Plan
Order Limit/Month
Price
Starter
Up to 100 orders
Growth
Up to 500 orders
Pro
Unlimited
Billing notes:
Billing is monthly
Order limits reset every billing cycle
If you exceed your limit, syncing is paused until upgrade or renewal
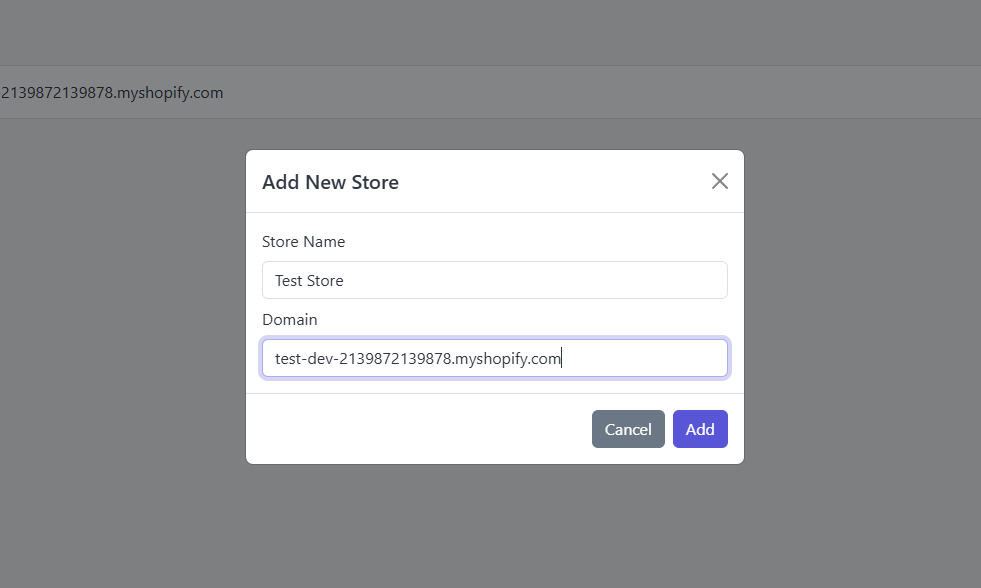
Step 4: Shopify Store Connection
Navigate to Stores → Add Store
Enter your Shopify store URL
Start the Shopify OAuth flow
Approve required permissions
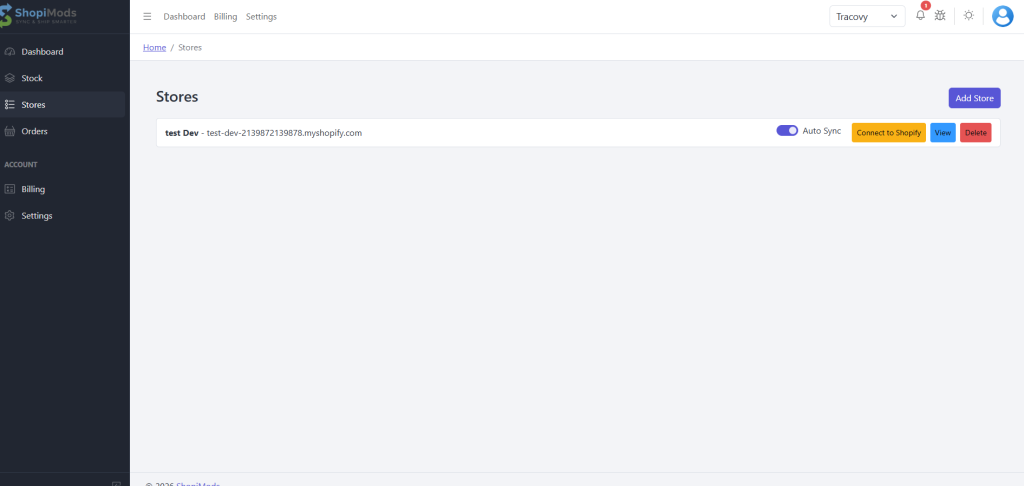
Once connected:
Webhooks are registered automatically
Orders, updates, and cancellations are now trackable
The store becomes active for syncing
Step 5: Add Stocks
Go to Stock Management
Add products using SKU
Each SKU must exactly match the Shopify SKU
Bundle Stock Rules
If a product is a bundle:
Add child (individual) stock items first
Then create the bundle stock
Map child SKUs to the bundle SKU
📌 Why this matters: When a bundle order is received from Shopify, the app sends child items to the external API instead of the bundle SKU.
Import Stock
You can bulk import stock:
Upload CSV / Excel file
Validate SKU mapping
Confirm import
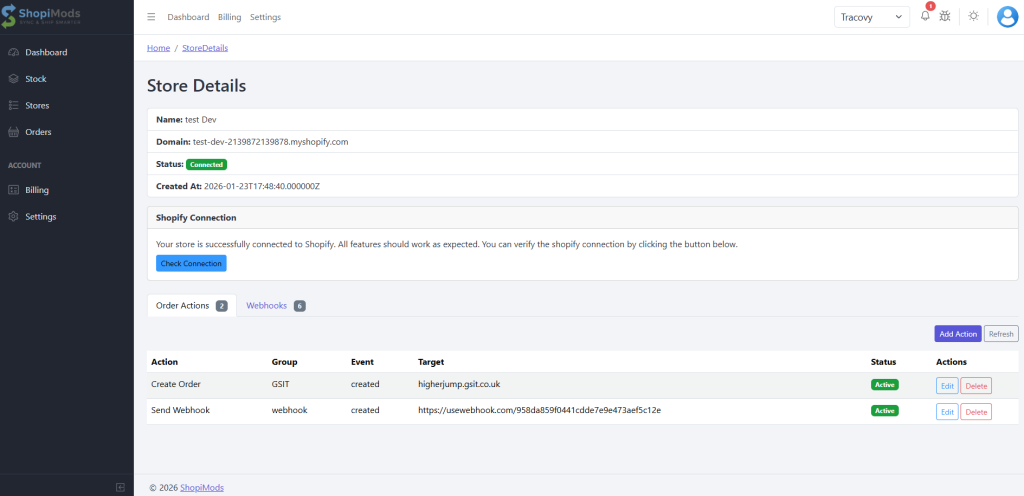
Step 6: Configure Store Actions
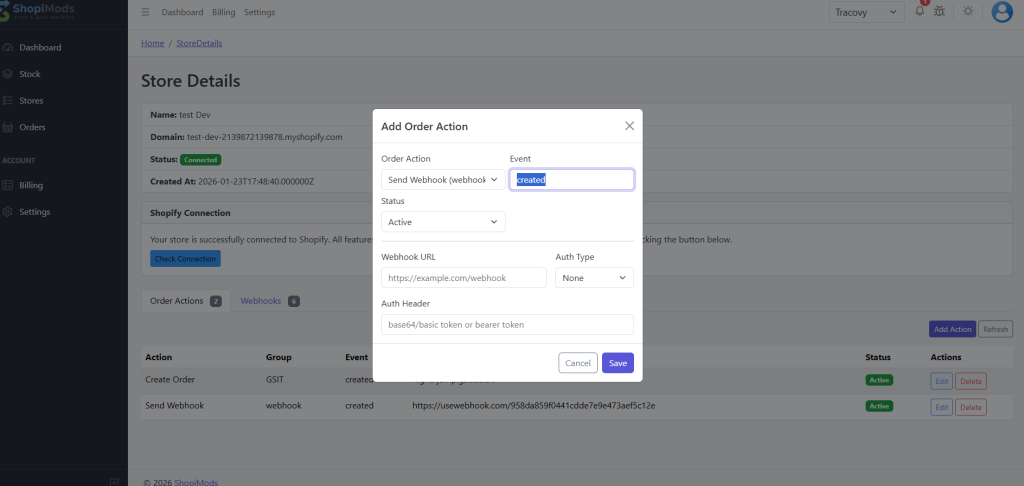
Order Actions define what your app should do when a specific order event happens (for example: when an order is created).
Go to Store Settings → Actions and configure:
Webhooks
Sends order data as JSON to an external platform.
Common values:
created → When a new order is created in Shopify
status → Controls whether this action is currently active.
webhook url → The endpoint URL where order data will be sent. (Example : https://example.com/webhook). This must be a publicly accessible HTTPS endpoint. The method will always be POST
What gets sent:
Full order JSON
Line items
Customer info
Shipping details
Bundle breakdown (if applicable)
auth type → Defines how the webhook request is authenticated. None → No authentication headers are sent Bearer Token → Uses an Authorization header Basic Auth → Uses Base64 encoded credentials
auth header→ The authentication token or credentials sent with the webhook request. Bearer token → Bearer sk_live_xxxxxxxxx Basic Auth → dXNlcjpwYXNzd29yZA== (Base64 encoded credentials)
How This Works in Real Life Shopify order is created Event = created Order Action = Send Webhook App formats the order JSON Webhook is sent to the configured URL External platform processes the order Updates (tracking / cancel / complete) are synced back later
🧠 Pro Tips You can create multiple actions for the same event. But you can’t create multiple actions of the same type. Example: You can have 1 webhook and 1 GSIT. But you can’t have 2 GSIT and 2 webhooks. Actions run top to bottom in the order list Inactive actions are ignored Logs for every action appear in Order Action Logs
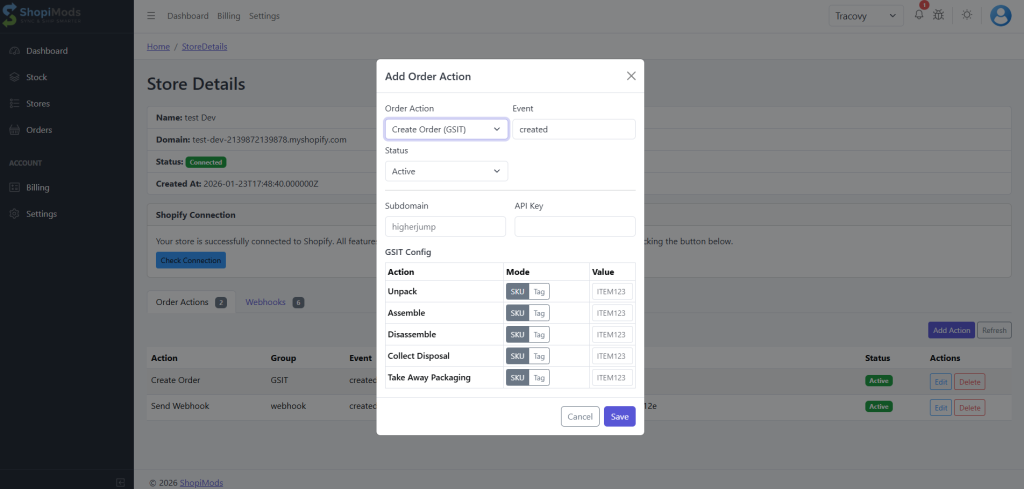
GSIT Integration
Enable GSIT mode if your fulfilment partner supports GSIT workflows. You will require the subdomain for GSIT xxx.gsit.co.uk. You will also need your API key for GSIT. You must also whitelist the IP addresses on your GSIT console for API access. You can get the details of the IP that you need to whitelist in your store configuration.
This action sends Shopify orders to a GSIT-based external fulfillment system, with structured operational steps like unpacking, assembling, and disposal.
Common values:
created → When a new order is created in Shopify
status → Controls whether this action is currently active.
subdomain → The GSIT platform subdomain for your fulfillment provider. (Each store can have a different GSIT subdomain.)
api key → The authentication key provided by the GSIT platform.
gsit config → This section defines how order line items are translated into GSIT operational steps. Each row represents a GSIT action.
Action Column Available GSIT actions include:
Action
Description
Unpack
Open or unpack received items
Assemble
Combine multiple items into one
Disassemble
Break a bundle into components
Collect Disposal
Collect items for disposal
Take Away Packaging
Remove packaging material
Mode Column Defines how the action is triggered.
Modes:
SKU → Action applies when a specific SKU is found
Tag → Action applies when an order or line item has a specific tag
📌 Toggle between SKU and Tag depending on your store logic.
Value Column
The identifier used by the selected mode.
Examples:
SKU Mode → ITEM123
Tag Mode → fragile, bundle, dispose
📌 Multiple actions can point to the same SKU if needed.
Example GSIT Flow
Shopify order is created
App checks GSIT action rules
Matching SKUs / tags are detected
GSIT order is created with:
Unpack instructions
Assemble / Disassemble steps
Disposal / packaging handling
GSIT platform executes the workflow
Status updates are synced back
Best Practices
Always test with one SKU first
Review execution in Order Action Logs
Step 7: Order Sync & Automation
Auto Sync Orders
Auto Sync ON → Orders sync automatically via webhooks
Auto Sync OFF → Manual sync required
Manual Sync (If Auto Sync Is Disabled)
Go to Orders
Select orders
Click Sync Orders
Orders are sent to the external platform
GSIT Order Workflow (If Enabled)
For GSIT-enabled stores, additional order states can be managed: